How to Fix the QuickTime Install Not Detected Error in The Foundry Nuke
Are you hitting a wall with the QuickTime install not detected error while using The Foundry Nuke? Don’t worry—you’re not alone! This frustrating issue pops up when Nuke can’t locate the QuickTime installation folder on your system. Fortunately, fixing it is simpler than you might think. In this step-by-step guide, I’ll walk you through two easy methods to resolve this error in 2025, so you can get back to creating stunning VFX without delay.
Let’s dive in and tackle this problem step by step!
Why Does the QuickTime Error Happen in Nuke?
First, let’s understand the root cause. The QuickTime install not detected error occurs because Nuke relies on QuickTime to process certain media files, but it can’t find the program’s executable path. This often happens after a fresh install or if QuickTime isn’t properly registered in your system. No path, no recognition—simple as that!
Thankfully, you can fix this by manually pointing Nuke to QuickTime’s location. Below, I’ll show you how to do it with two proven methods. Ready? Let’s get started!
Method 1: Add QuickTime to System Environment Variables
This is the quickest and most reliable way to fix the QuickTime not detected issue. Here’s how you do it:
Step 1: Download QuickTime
Before anything else, ensure you have QuickTime installed. Head to the official Apple website and grab the latest version. Click here to download QuickTime now—it’s free and fast!
Step 2: Locate the QuickTime Folder
Once installed, QuickTime usually lands in C:Program Files (x86)QuickTime. Jot this path down—you’ll need it soon!
Step 3: Open Environment Variables
Now, let’s tell your system where QuickTime lives. Follow these steps:

- Press Windows + S and type “Environment Variables”.
- Select “Edit the system environment variables” from the results.
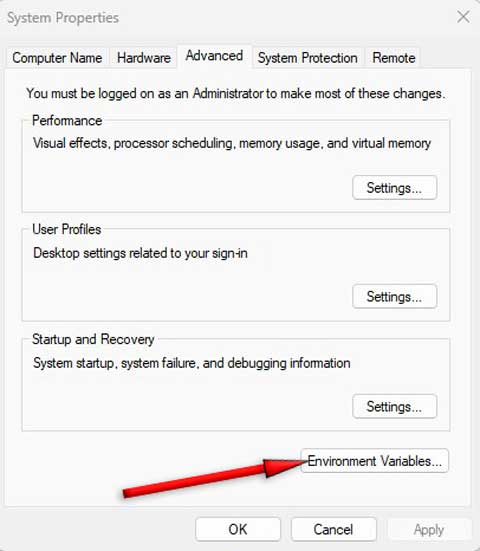
- In the System Properties window, click the “Environment Variables” button.
Step 4: Add a New System Variable
Here’s where the magic happens:

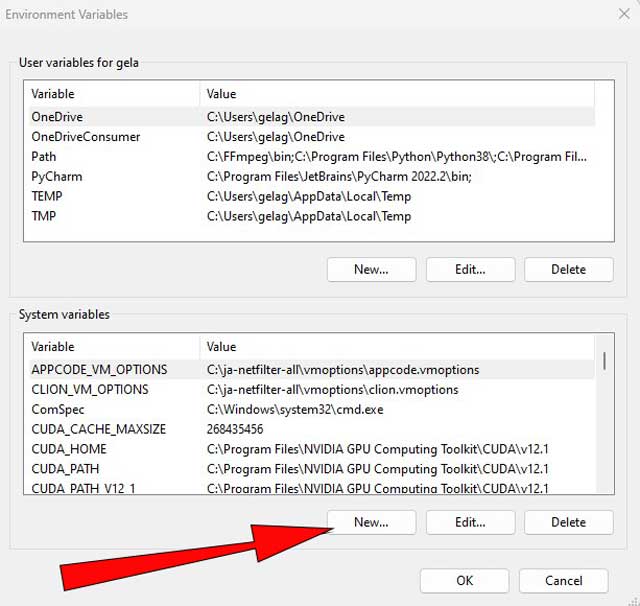
- Under “System Variables,” click “New”.
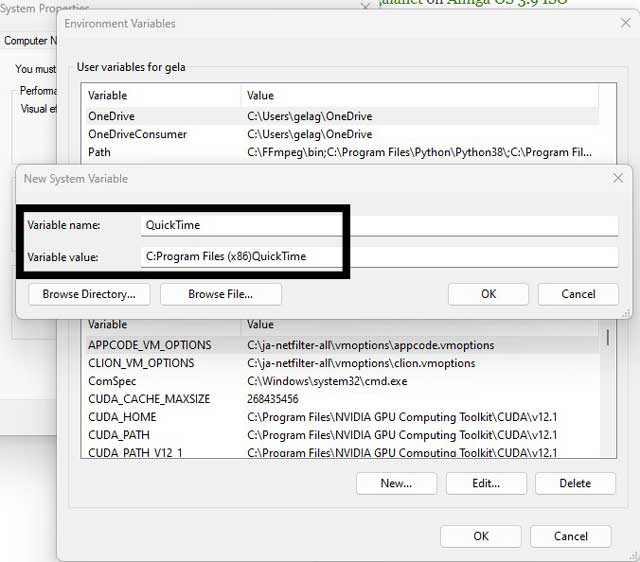
- For Variable Name, type QuickTime.
- For Variable Value, paste C:Program Files (x86)QuickTime (or your custom path if it’s different).
- Hit OK to save everything.
Step 5: Restart Nuke
Close all windows, restart Nuke, and voilà—the QuickTime install not detected error should vanish! Test it out by loading a media file. If it works, you’re golden!

Method 2: Edit the System Path Variable
If Method 1 didn’t do the trick—or you prefer an alternative—try this approach. It’s just as effective and builds on the same idea.
Step 1: Access the Path Variable
- Go back to Environment Variables (Windows + S > “Edit the system environment variables”).
- Under “System Variables,” scroll to find “Path” and click “Edit”.
Step 2: Add QuickTime’s Path
- Click “New” in the Edit window.
- Type or paste C:Program Files (x86)QuickTime.
- Click OK to close each window and save your changes.
Step 3: Restart and Test
Restart Nuke again. Load a file, and check if the QuickTime not detected error is history. Most users find this method works like a charm!
Extra Tips to Avoid QuickTime Issues in Nuke
To keep things running smoothly, here are a few bonus tips:
- Update QuickTime Regularly: An outdated version can cause compatibility hiccups.
- Check Your Nuke Version: Ensure it aligns with QuickTime’s requirements.
- Run Nuke as Administrator: Sometimes, permissions make a difference.
Wrapping Up: Say Goodbye to the QuickTime Error
There you have it—two simple, actionable ways to fix the QuickTime install not detected error in The Foundry Nuke! Whether you choose Method 1 or Method 2, you’ll be back to rendering jaw-dropping visuals in no time. Plus, now that you know how to tweak system variables, you’re a step ahead in troubleshooting tech glitches.
Did this guide help you? Drop a comment below and let me know! If you’ve got friends struggling with the same issue, share this post—it might just save their day. Happy creating!
Awesome Man. Thanks for the post. It resolved my nuke to quicktime error